5.1.2 Surround Sound Setup Guide for Medium Living Rooms
Achieving an immersive home theater experience requires a precise 5.1.2 surround sound setup, which this guide thoroughly details for medium living rooms in 2026, covering essential components and optimal speaker placement.
Embarking on the journey to transform your medium living room into a cinematic haven begins with understanding the intricacies of a 5.1.2 surround sound setup. This comprehensive guide will walk you through every essential step, ensuring you achieve an unparalleled audio experience for movies, music, and gaming in 2026 and beyond.
Understanding the 5.1.2 Configuration: The Foundation of Immersive Audio
Before diving into the practical aspects of installation, it's crucial to grasp what a 5.1.2 system entails. This configuration is a popular choice for home theaters, especially in medium-sized living rooms, because it balances immersive sound with practical space considerations. The numbers refer to distinct audio channels: five traditional surround sound speakers, one subwoofer for low-frequency effects, and two overhead or up-firing speakers for height effects, bringing a new dimension to your audio.
This setup significantly elevates the auditory experience beyond standard stereo or even traditional 5.1 systems. The addition of height channels is particularly transformative, enabling technologies like Dolby Atmos and DTS:X to create a three-dimensional soundscape where audio objects can move above and around you. This means that a helicopter flying overhead in a movie will truly sound like it's passing above your head, rather than just in front or to the sides.

The Components of a 5.1.2 System
A successful 5.1.2 setup relies on several key components working in harmony. Each piece plays a vital role in delivering the full, rich sound experience you expect from a modern home theater. Understanding these components is the first step towards making informed decisions about your purchases and setup.
- AV Receiver: This is the brain of your home theater system, processing audio and video signals, amplifying sound to your speakers, and managing connections.
- Front Left and Right Speakers: These deliver the primary audio, including dialogue, music, and main sound effects.
- Center Channel Speaker: Crucial for clear dialogue, ensuring conversations are always intelligible, even amidst intense action scenes.
- Surround Left and Right Speakers: Placed to the sides or slightly behind the main listening position, these create ambient sounds and immerse you in the scene.
- Subwoofer: Responsible for deep bass frequencies, adding impact to explosions, music, and other low-end effects.
- Height Speakers (2): These are the '.2' in 5.1.2. They can be in-ceiling speakers, on-wall speakers angled downwards, or up-firing speakers that bounce sound off the ceiling.
Each component must be carefully selected to match your room's acoustics and your personal audio preferences. The quality of your AV receiver, for example, will dictate how effectively it can decode and deliver immersive audio formats. Similarly, the size and power handling of your speakers should be appropriate for your room's dimensions to avoid underpowering or overpowering the space.
In conclusion, the 5.1.2 configuration offers a robust foundation for an immersive audio experience. By understanding its core components and their roles, you are well-prepared to embark on the setup process and enjoy truly captivating sound in your medium living room.
Choosing the Right Equipment for Your Medium Living Room
Selecting the appropriate equipment is paramount for a successful 5.1.2 surround sound setup. Given that we are focusing on medium-sized living rooms, there's a sweet spot in terms of speaker size, amplifier power, and subwoofer output that will deliver optimal performance without overwhelming the space. Overlooking these details can lead to either an underpowered system or one that sounds boomy and unbalanced.
Consider the aesthetics of your living room as well. While performance is key, modern audio equipment is designed to blend seamlessly with home decor. Many manufacturers offer sleek, compact designs that don't compromise on sound quality, ensuring your home theater enhances both your auditory and visual environment.
Selecting Your AV Receiver
Your AV receiver is the central hub for your entire system. For a 5.1.2 setup, you'll need a receiver that supports at least 7.2 channels to accommodate the two height speakers. More importantly, ensure it supports the latest audio formats like Dolby Atmos and DTS:X, which are essential for true 3D audio. Look for features such as HDMI 2.1 for 8K video pass-through, eARC for simplified audio return from your TV, and robust room correction software.
Room correction systems, such as Audyssey or YPAO, are invaluable. They analyze your room's acoustics and automatically calibrate your speakers for optimal sound, compensating for speaker placement limitations and room anomalies. This feature alone can significantly improve your audio experience, making it sound like a professional tuned your system.
Speakers and Subwoofer Considerations
For a medium living room, bookshelf speakers or compact floor-standing speakers are typically ideal for the front and surround channels. The center channel speaker should be horizontally oriented and designed to match the tonal characteristics of your front speakers for a cohesive soundstage. When it comes to height speakers, decide between in-ceiling options for a cleaner look or up-firing modules for easier installation without cutting into your ceiling.
A single, well-chosen subwoofer is usually sufficient for a medium room. Look for a subwoofer with a driver size between 8 and 12 inches, offering a good balance of deep bass extension and musicality. Placement is critical for subwoofers, and you might need to experiment to find the spot that provides the most even bass response across your listening area.
Ultimately, the right equipment combines technical specifications with practical considerations for your specific living space. Investing in quality components that are appropriately sized for your medium living room will lay the groundwork for a truly exceptional 5.1.2 surround sound experience.
Optimal Speaker Placement for Medium Living Rooms
Precise speaker placement is arguably the most critical factor in achieving an immersive 5.1.2 surround sound experience. Even the most expensive equipment will sound subpar if speakers are positioned incorrectly. The goal is to create a seamless sound field where effects transition smoothly between channels, and dialogue remains anchored to the screen. Every speaker has a specific role, and its location directly impacts how well it can fulfill that role.
Understanding the geometry of your listening space and how sound waves interact with walls and furniture is key. While there are general guidelines, every room is unique, and minor adjustments based on your specific layout can yield significant improvements. Don't be afraid to experiment slightly once the initial setup is complete.
Front and Center Speaker Positioning
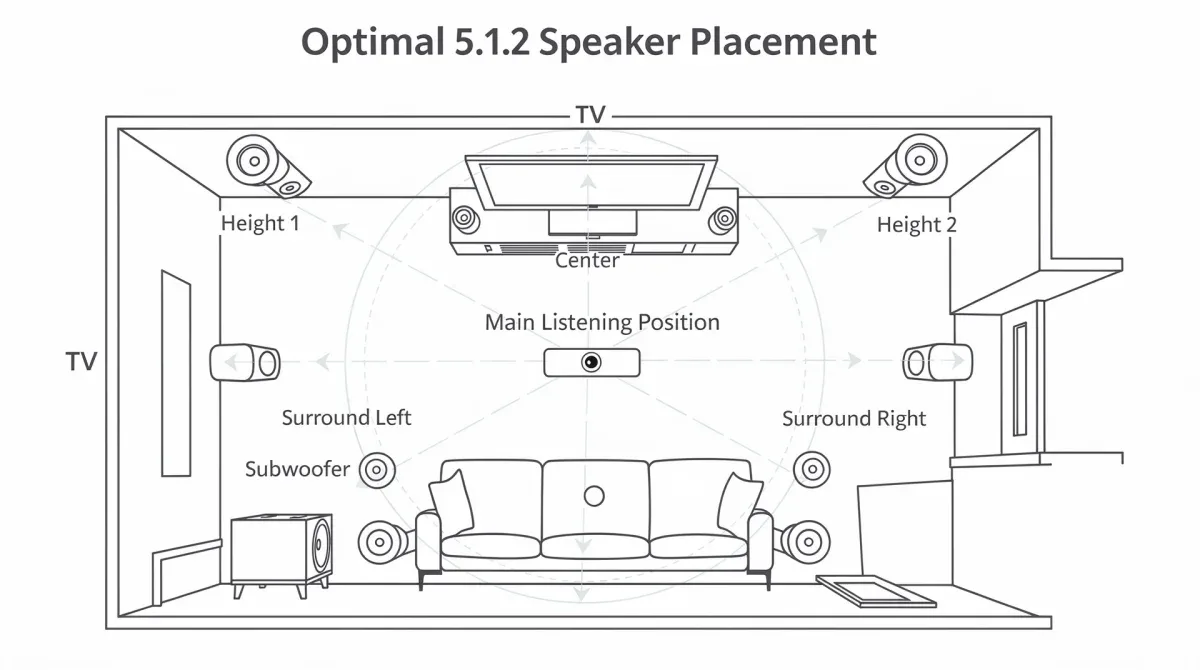
Your front left and right speakers should form an equilateral triangle with your main listening position, angled slightly inward towards the listener. The center channel speaker should be placed directly above or below your TV, as close to the screen as possible, and at ear level when seated. This ensures dialogue appears to come directly from the actors on screen. All three front speakers should ideally be at the same height to maintain a consistent soundstage.
Avoid placing front speakers too close to walls, as this can cause bass frequencies to become boomy and indistinct. If wall placement is unavoidable, consider speakers with front-firing ports or acoustic treatment behind the speakers to mitigate reflections. The distance between your front left and right speakers should also be considered in relation to your viewing distance to create a wide, engaging soundstage.
Surround and Height Speaker Placement
The surround left and right speakers should be placed to the sides or slightly behind the main listening position, approximately 90-110 degrees off-axis from the center. They should be elevated slightly above ear level, typically about 1-2 feet higher than your seated ear height. This helps create a diffuse surround field without drawing attention to the individual speakers. Avoid placing them directly behind you, as this can create a 'hole' in the side-to-side soundstage.
For height speakers, if using in-ceiling models, they should be placed slightly in front of and wider than your main listening position, roughly 45 degrees off-axis from the center. If using up-firing speakers, place them on top of your front left and right speakers, ensuring they have a clear path to the ceiling. The ceiling should ideally be flat and reflective for these speakers to work effectively. The goal for height speakers is to create a sense of overhead sound without localizing the sound source to the speaker itself.
Optimal speaker placement transforms a collection of audio components into a cohesive, immersive sound system. By following these guidelines and making minor adjustments for your specific room, you can unlock the full potential of your 5.1.2 setup.
Connecting Your 5.1.2 System: Wiring and Calibration
Once your speakers are strategically placed, the next critical step is connecting them to your AV receiver and then calibrating the entire system. Proper wiring ensures that each speaker receives the correct audio signal without interference, while calibration optimizes the sound for your specific room acoustics. Rushing through these stages can undermine all the careful planning that went into selecting and placing your equipment.
Attention to detail during wiring not only improves sound quality but also contributes to the longevity of your components. Using good quality speaker wire and making secure connections prevents signal loss and potential damage to your amplifier or speakers. Similarly, calibration is not just a formality; it's the process that fine-tunes your system to deliver its best performance in your unique listening environment.
Wiring Your Speakers to the AV Receiver
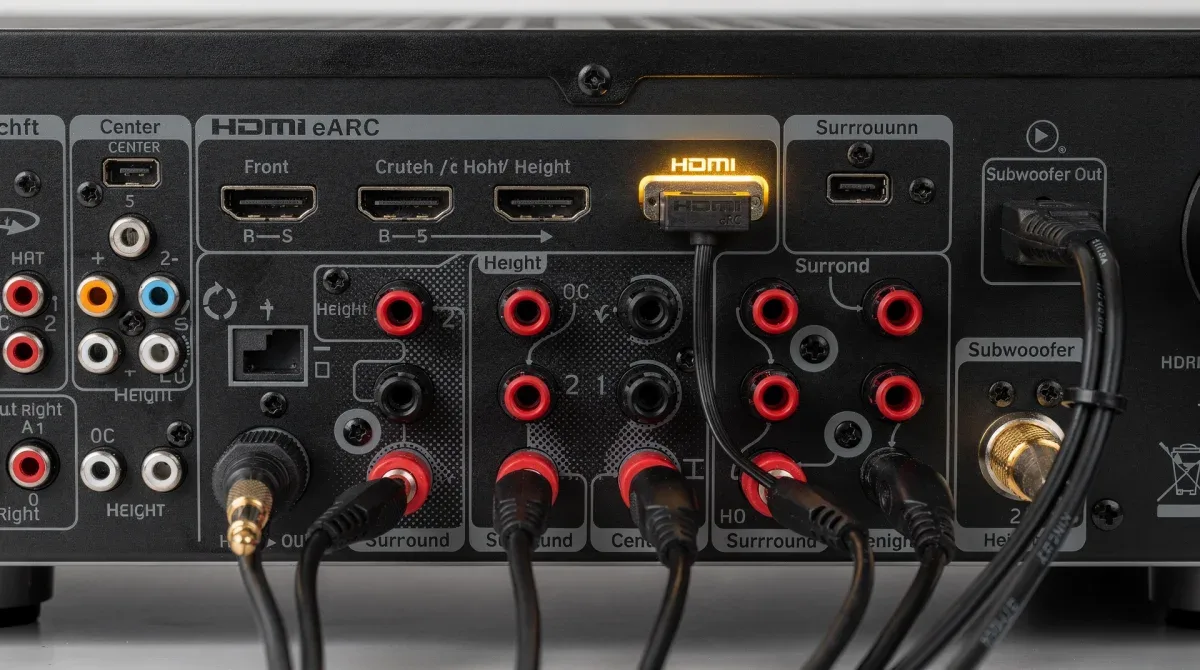
Begin by ensuring all components are unplugged from power. Use appropriate gauge speaker wire for the length of your runs; generally, 16-gauge wire is suitable for most medium living rooms, but longer runs or more powerful speakers might benefit from 14-gauge. Connect the positive (+) terminal on each speaker to the positive (+) terminal on the corresponding channel on your AV receiver, and similarly for the negative (-) terminals. Double-check all connections to ensure correct polarity, as reversed polarity can significantly degrade sound quality.
Connect your subwoofer to the AV receiver's dedicated LFE (Low-Frequency Effects) or Subwoofer Pre-Out port using an RCA cable. For your video sources (Blu-ray player, streaming device, gaming console), connect them to the HDMI input ports on your AV receiver. Then, connect the HDMI output from your AV receiver to an HDMI input on your TV, preferably using the eARC (enhanced Audio Return Channel) port if available on both devices for simplified audio routing.
Running Room Correction and Manual Adjustments
After all connections are made, power on your AV receiver and TV. The first step in calibration is usually running the receiver's built-in automatic room correction system (e.g., Audyssey, YPAO, MCACC). Follow the on-screen prompts, which typically involve placing a setup microphone at your primary listening position and sometimes at several other points in the room. This system measures speaker distances, levels, crossovers, and applies equalization to optimize sound.
Once the automatic calibration is complete, it's beneficial to make some manual adjustments. Check speaker levels using an SPL (Sound Pressure Level) meter (apps are available for smartphones) to ensure all channels are playing at a consistent volume. Adjust the subwoofer level to your preference – it should blend seamlessly with the other speakers, providing impactful bass without being overpowering. You might also fine-tune speaker distances if the automatic system seems slightly off, but generally, the automatic systems are quite accurate.
The careful process of wiring and calibration is what transforms individual components into a harmonious 5.1.2 surround sound system. Taking the time to do this correctly will ensure you experience truly immersive audio tailored to your medium living room.
Optimizing Audio Settings and Fine-Tuning Your Experience
With your 5.1.2 system connected and calibrated, the journey isn't quite over. The next phase involves delving into your AV receiver's audio settings and fine-tuning various parameters to extract the best possible performance. This optimization goes beyond basic calibration, allowing you to personalize the sound profile to your specific tastes and the content you're enjoying. It’s about making subtle adjustments that can significantly enhance clarity, dynamics, and overall immersion.
Often, default settings, even after automatic calibration, can be improved upon with a little user intervention. Think of it as tailoring a suit – the off-the-rack fit is good, but a custom fit is exceptional. This phase also involves understanding different audio modes and how to apply them for various types of content, from action movies to delicate musical performances.
Understanding Crossover Frequencies and Speaker Size
One of the most important settings to review is the crossover frequency for each speaker. This determines the point at which low frequencies are redirected from your main speakers to the subwoofer. Generally, smaller speakers benefit from higher crossover points (e.g., 80Hz-100Hz), allowing the subwoofer to handle more of the bass. Larger speakers might handle lower frequencies more effectively, allowing for a lower crossover (e.g., 60Hz or less). Your room correction system will suggest these, but manual adjustments can sometimes yield better integration between your speakers and subwoofer.
- Small vs. Large Speaker Settings: Even if your speakers are physically large, setting them to 'Small' in your receiver's menu is often recommended. This tells the receiver to send all bass below the crossover point to the subwoofer, which is typically better equipped to handle deep low frequencies.
- Subwoofer Phase: Experiment with the subwoofer's phase setting (0 or 180 degrees). This can improve the integration of the subwoofer with your main speakers, resulting in tighter, more impactful bass.
- Dynamic Range Control: For late-night viewing, consider enabling dynamic range compression or 'night mode.' This reduces the difference between the loudest and quietest sounds, preventing sudden loud explosions from disturbing others while still keeping dialogue audible.
Adjusting these settings can dramatically impact how your system sounds, leading to a more balanced and impactful audio presentation. It requires a bit of experimentation, but the results are well worth the effort.
Exploring Audio Modes and Enhancements
Your AV receiver likely offers a variety of audio processing modes. Beyond standard Dolby Atmos and DTS:X modes, you might find options like 'Pure Direct' for unadulterated stereo sound, various DSP (Digital Signal Processing) modes for different environments (e.g., 'Concert Hall'), and upmixing technologies that can convert stereo or 5.1 content into a 5.1.2 experience. Experiment with these modes to find what sounds best for different types of content.
Some receivers also include sound enhancements like dialogue enhancers or bass boosters. Use these sparingly, as they can sometimes introduce artificiality to the sound. The goal is a natural, immersive sound experience. Regularly checking for firmware updates for your AV receiver is also a good practice, as these can often introduce new features, improve performance, or fix bugs.
Optimizing audio settings is an ongoing process of refinement. By understanding and experimenting with crossover frequencies, speaker settings, and various audio modes, you can truly unlock the full potential of your 5.1.2 surround sound system and tailor it perfectly to your medium living room and listening preferences.
Troubleshooting Common 5.1.2 Setup Issues
Even with careful planning and execution, you might encounter minor hurdles during or after your 5.1.2 surround sound setup. Troubleshooting is a normal part of any complex technical installation, and many common issues have straightforward solutions. Being prepared to identify and address these problems will save you time and frustration, ensuring your path to immersive audio remains smooth. It's often the small details that can cause significant perceived issues.
Before assuming a major malfunction, always start with the simplest checks. Many problems stem from loose connections, incorrect settings, or minor oversights that are easy to rectify once identified. A systematic approach to troubleshooting is always the most effective strategy.
No Sound or Distorted Audio
If you're getting no sound from certain speakers or distorted audio, start by checking all speaker wire connections at both the speaker and AV receiver ends. Ensure that positive (+) and negative (-) terminals are correctly matched and that no stray wire strands are touching, which can cause short circuits. Verify that the correct input source is selected on your AV receiver and that your TV's audio output is set to the correct format (e.g., Bitstream or PCM) and routed via HDMI eARC if applicable.
- Speaker Assignment: Double-check your AV receiver's speaker setup menu to ensure all speakers are correctly assigned and enabled (e.g., front left, center, subwoofer, etc.).
- Volume Levels: Confirm that the volume on your AV receiver isn't muted or set to an extremely low level. Also, check individual speaker trim levels in the setup menu.
- Source Content: Ensure the content you're playing actually has a 5.1.2 audio track. Some older content might only be stereo or 5.1, which your receiver will upmix or play in a simpler format.
Distorted audio can also be a sign of overdriving your speakers or amplifier. Try reducing the volume or checking for any loose speaker grilles or damaged speaker cones. If the distortion is localized to a single speaker, swap it with another speaker to determine if the issue lies with the speaker itself or the receiver channel.
Subwoofer Issues and Unbalanced Sound
Common subwoofer problems include no bass, boomy bass, or bass that sounds disconnected from the rest of the system. First, verify the subwoofer's power connection and ensure it's turned on. Check the RCA cable connection to both the subwoofer and the AV receiver. On the subwoofer itself, ensure the volume knob isn't set too low and that the phase switch is correctly positioned (try both 0 and 180 degrees to see which sounds better).
If the bass is boomy, try adjusting the subwoofer's crossover frequency in your AV receiver's settings to integrate it better with your main speakers. Experiment with the subwoofer's placement – even moving it a foot or two can drastically change the bass response in a room. An unbalanced soundstage, where one side sounds louder or clearer, often points to incorrect speaker levels. Re-run your room correction software or manually adjust individual speaker levels using an SPL meter.
Troubleshooting requires patience and a systematic approach. By addressing these common issues, you can resolve most problems and get back to enjoying your perfectly tuned 5.1.2 surround sound system in your medium living room.
Maintaining Your 5.1.2 System for Longevity and Performance
Once your 5.1.2 surround sound setup is perfectly tuned and delivering an immersive audio experience, the next step is to ensure its longevity and sustained performance. Proper maintenance isn't just about cleaning; it involves a series of practices that protect your investment, optimize sound quality over time, and keep your system running smoothly for years to come. Neglecting maintenance can lead to degraded performance, premature component failure, and a less enjoyable listening experience.
Regular care and attention can prevent many common issues before they even start. Think of it as preventative medicine for your home theater. This proactive approach will save you from potential headaches and costly repairs down the line, ensuring your system remains a source of premium entertainment.
Dusting and Cable Management
Dust is the enemy of electronics. Regularly dust your AV receiver, speakers, and subwoofer to prevent buildup, which can lead to overheating and component failure. Use a soft, dry cloth or a can of compressed air for hard-to-reach areas. Ensure ventilation ports on your receiver are clear and unobstructed. Good cable management not only improves the aesthetic of your living room but also prevents accidental disconnections and reduces potential interference. Use cable ties or sleeves to organize wires neatly, keeping them off the floor and away from foot traffic.
Proper airflow around your AV receiver is crucial. Avoid placing it in enclosed cabinets without adequate ventilation. If your receiver runs hot, consider adding a small fan to the cabinet to improve air circulation. Overheating is a leading cause of electronic component failure, and a little attention here can significantly extend the life of your equipment.
Firmware Updates and Component Checks
Periodically check for firmware updates for your AV receiver. Manufacturers often release updates that improve performance, add new features, or fix bugs. Refer to your receiver's manual or the manufacturer's website for instructions on how to perform updates. Additionally, periodically inspect all speaker wire connections for looseness or corrosion. Re-tighten any loose terminals and clean any signs of corrosion to ensure optimal signal transfer.
- Speaker Grille Inspection: Check speaker grilles for any tears or damage that could affect sound dispersion. Replace them if necessary.
- Subwoofer Test: Play some bass-heavy content and listen for any rattles or unusual noises from your subwoofer, which could indicate a problem.
- Remote Control Batteries: Don't forget the simple things! Replace remote control batteries regularly to ensure uninterrupted control of your system.
Maintaining your 5.1.2 system is an ongoing commitment that pays off in sustained performance and enjoyment. By dedicating a small amount of time to these practices, you ensure your home theater continues to deliver an outstanding audio experience for years to come.
| Key Setup Step | Brief Description |
|---|---|
| Equipment Selection | Choose a 7.2-channel AV receiver and speakers suitable for a medium room. |
| Speaker Placement | Position front, center, surround, and height speakers for optimal soundfield. |
| Wiring & Calibration | Connect all components with correct polarity and run automatic room correction. |
| Audio Optimization | Fine-tune crossover frequencies, speaker sizes, and explore audio modes. |
Frequently Asked Questions About 5.1.2 Surround Sound
What does 5.1.2 mean in a surround sound system?▼The numbers in 5.1.2 refer to the speaker configuration. '5' denotes five traditional surround speakers (front left/right, center, surround left/right), '.1' signifies one subwoofer for bass, and '.2' indicates two overhead or up-firing speakers for height effects, enabling immersive 3D audio formats like Dolby Atmos.
Do I need special content for 5.1.2 surround sound?▼While a 5.1.2 system can upmix standard stereo or 5.1 content, you'll get the full immersive experience with content specifically encoded for Dolby Atmos or DTS:X. Many modern Blu-rays, 4K streaming services, and video games support these advanced audio formats for true 3D sound.
Can I use my existing speakers for a 5.1.2 setup?▼Yes, you can often reuse your existing 5.1 speakers. You'll primarily need to add two new height-enabled speakers (in-ceiling, on-wall, or up-firing modules) and ensure your AV receiver supports at least 7.2 channels to power the additional height channels. Compatibility with your receiver is key.
What's the difference between in-ceiling and up-firing height speakers?▼In-ceiling speakers are installed directly into your ceiling, providing a direct overhead sound source and a clean aesthetic. Up-firing speakers sit on top of your front (or sometimes surround) speakers and bounce sound off the ceiling to create the illusion of overhead effects, offering easier installation without ceiling modification.
How do I calibrate my 5.1.2 system for optimal sound?▼Most modern AV receivers include an automatic room correction system (e.g., Audyssey, YPAO). You'll use a supplied microphone at your listening position to measure speaker distances, levels, and apply equalization. After this, you can make minor manual adjustments to crossover frequencies and individual speaker levels for fine-tuning.
Conclusion
Setting up a 5.1.2 surround sound system in your medium living room is a rewarding endeavor that significantly elevates your home entertainment experience. By meticulously following this step-by-step guide, from understanding the core components and selecting the right equipment to precise speaker placement, proper wiring, and advanced audio optimization, you are well on your way to achieving truly immersive and captivating sound. Remember that patience and attention to detail during each stage will yield the best results, transforming your living room into a cinematic oasis for years to come.
